Blogger 範本:網誌標題、文章標題「h1、h2、h3」標籤 SEO 最佳化
Blogger SEO:一般 Blogger 網誌標題 ( 網站標頭 ) 在沒有做過特別的設定的情況下,於 HTML 標記中皆顯示為「h1 標籤 tag」而且為全域性的 ( 包含首頁、文章頁、標籤頁面 . . . 等 ),文章標題的部份則為「h3 標籤 tag」,這樣的呈現方式對於做 SEO ( 搜尋引擎最佳化 ) 佈局時,是較為不理想的標籤組合。
從「Blogger 範本:文章標題及網誌名稱 SEO 優化」這篇來觀察可以發現,我們在做過文章標題及網誌名稱排列組合優化後,雖然能讓文章在搜尋引擎中,呈現「文章標題」的權重比相對於「網誌名稱」還來的重要的排列結果。
但由於 HTML 內的「h1 及 h3 標籤」還沒做過改變,搜尋引擎在抓取網站的文章頁時,還是會以網誌名稱「h1 標籤」為第一優先順序,這樣對於在茫茫網海中關鍵字充斥在文章標題的情況下,有做過「h1、h2 及 h3 標籤」排列優化的文章標題,自然在搜尋引擎中會有較前面的排列結果。
所以本篇設置重點則以 Blogger 範本「h1、h2、h3」標籤排列結果 SEO 最佳化為原則,將 Blogger 網誌標題 ( 含文字、圖片 ) 及文章標題的「h1 及 h2」做重新的配置。

這裡規劃設計「首頁、搜尋、標籤 label、網誌存檔」頁面時, HTML 標頭 ( 網誌標題、網誌名稱 ) 顯示「h1」文章標題顯示「h2」。因為在這幾個頁面,文章標題都是處於列表的狀態。
在「item 文章頁面、static_page 靜態網址頁」的情況下標頭顯示「h2」文章標題則顯示「h1」。因為這兩個頁面是「搜尋引擎主要搜尋的目標」。
網誌標題、文章標題除了「h1 及 h2」排列優化外,若你網站的標頭 ( 網誌標題、網誌名稱 ) 是以圖片的呈現方式,經由本篇的設置過後也能夠讓標頭、文章標題的「h1 及 h2」正確顯示。
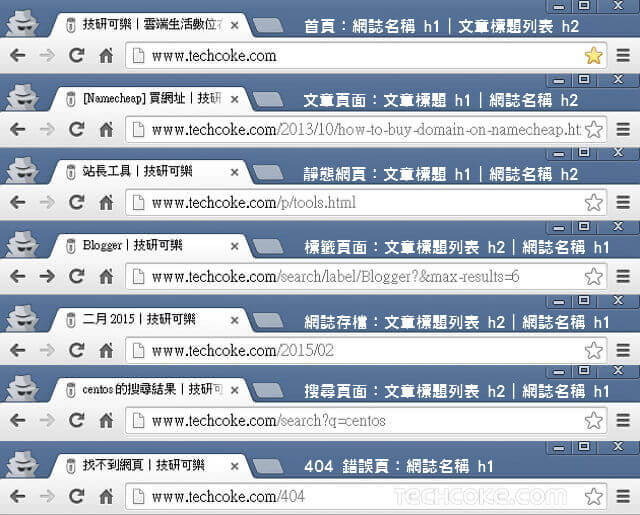
上圖大致意思是,搜尋引擎撈取文章頁面與靜態網址頁面的資料時,文章標題為 h1 標籤,網誌標題為 h2 標籤。除了文章頁面與靜態網址頁面之外的「其他頁面」則為,文章標題為 h2 標籤,網誌標題為 h1 標籤。
文章中的範例,僅以下列打勾的官方版型做示例,其他官方版型可如法泡製。如果使用本文做練習,也可應用以下模板試作,出問題的機率會比較低。

圖片當作網誌名稱,範例網址:「http://demo3.techcoke.com/」( 行動版 DEMO )
觀察每個頁面的 h1 h2 部署情形,建議使用「Chrome 擴充:Open SEO Stats」。其中的「網頁資訊」功能頁籤,能快速檢測網頁 h1 h2 即時資訊。

「小工具」預設在每一次安裝後,Blogger 系統會自動添加「h2 標籤」到小工具的標題中,這需要在每安裝一次小工具時就調整一次。這不利 SEO 部署。比較建議的做法是將「h2 標籤」改為「h3、h4 或 h5」。調整小工具「h2 標籤」為「h3 標籤」請見「Blogger 版面配置小工具標題 HTML 標籤 SEO 優化」。
Blogger 官方預設版型的「文章日期」是配置為「h2 標籤」,這不利 SEO 部署。比較建議的做法是將「h2 標籤」改為「h3、h4 或 h5」。調整文章日期「h2 標籤」為「h4 標籤」請見「Blogger 文章日期 HTML 標籤 SEO 優化」。
標頭放入圖片後使用以下三種模式,皆可正確使用:

在本文「STEP 2」的代碼中,可以觀察到「
完整的「
將以上原始代碼「h3」的部份變更為「h2」,就完成行動版首頁文章標題「h2」的部署。如下代碼:
我們將上面「Step3-2」的整體原始程式碼,使用「
「Step3-2」這裡的用法可以觀察到,基本上,就是和標頭段的「
接著一樣的,我們將上面「Step3-3」的整體原始程式碼,使用「
如下圖,「範本設計工具」中我們會增添「網誌名稱 h1 (首頁顯示)、網誌名稱 h2 (首頁隱藏)」與「文章標題 h1 (首頁隱藏)、文章標題 h2 (首頁顯示)」的設置選項。

雖然「範本設計工具」中,只能顯示『首頁』的即時預覽「網誌名稱 h1 (首頁顯示)」與「文章標題 h2 (首頁顯示)」的變更。但經由以下 CSS 部署過後,『文章內頁』的「網誌名稱 h2 (首頁隱藏)」與「文章標題 h1 (首頁隱藏)」皆能正常運作。
(* 「範本設計工具」即時預覽看不到,但是直接調整文字粗細、大小、顏色,「網誌名稱 h2 (首頁隱藏)」與「文章標題 h1 (首頁隱藏)」在儲存後,於文章內頁都能正常使用。)
接著直接使用以下代碼,置換上面「Step4-1」標頭的原始 CSS 資料。
接下來,再到範本中搜尋「
我們在上段「
到這裡標頭 h1、h2 的「範本設計工具」 CSS 資料就設置完成了,而且開始正常運作。
接著直接使用以下代碼,置換上面「Step4-2」文章標題的原始 CSS 資料。
接下來,再到範本中搜尋「
我們使用下面的 h1、h2 文章標題 CSS 代碼,直接置換掉 h3 文章標題的原始 CSS資料。整體代碼如下:
先不要執行本文的 STEP 2 ~ STEP 4。
接著可以在「首頁」與「文章頁面」,對著標頭 ( 網誌名稱 ) 與文章標題按右鍵,選擇檢查。
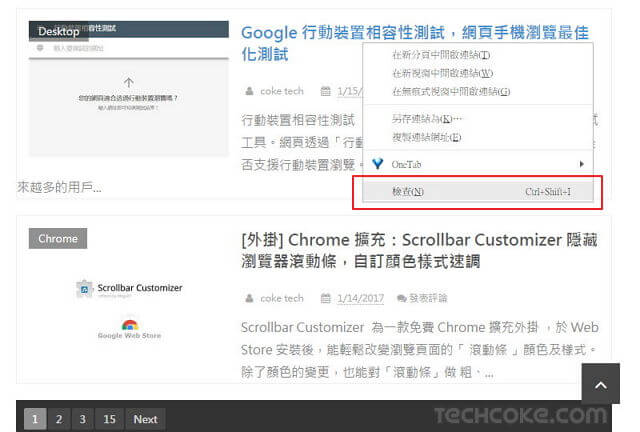
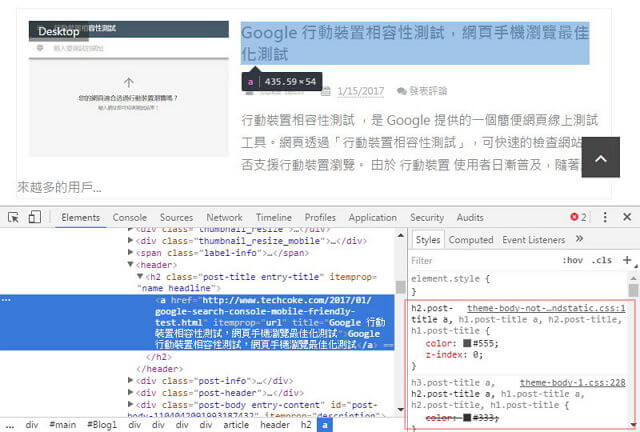
此時左頁框會顯示 HTML 資料,右頁框會顯示 CSS 資料。將右頁框對應左頁框標頭與文章標題的 h1、h2 中的 CSS 資料,先做複製。
接下來執行本文的 STEP 2 ~ STEP 4 的步驟。
接著找到並註釋掉範本中,原始「標頭 h1」與「文章標題 h1 或 h2 或 h3」中的 CSS 資料。
緊接著於範本中使用以下頁面判段式,慢慢調整 CSS 的部份,即可完成。
額外的,使用文章中的方式部署「標頭、文章標題的 h1、h2」SEO,建議搭配「Blogger 範本:文章標題及網誌名稱 SEO 優化」一起使用。
「STEP 5 非官方版型的簡易 CSS 調整方式」這部份,版型實在太多,基本調整方式,就如「STEP 5」所述。由於瀏覽器是從上往下撈網站資料,所以,不註釋掉範本中,原始「標頭 h1」與「文章標題 h1 或 h2 或 h3」中的 CSS 資料,也無妨。
Blogger 範本:版面配置「小工具標題」HTML 標籤 SEO 優化
[教學] Blogger 範本:文章標題及網誌名稱 SEO 優化教學
從「Blogger 範本:文章標題及網誌名稱 SEO 優化」這篇來觀察可以發現,我們在做過文章標題及網誌名稱排列組合優化後,雖然能讓文章在搜尋引擎中,呈現「文章標題」的權重比相對於「網誌名稱」還來的重要的排列結果。
但由於 HTML 內的「h1 及 h3 標籤」還沒做過改變,搜尋引擎在抓取網站的文章頁時,還是會以網誌名稱「h1 標籤」為第一優先順序,這樣對於在茫茫網海中關鍵字充斥在文章標題的情況下,有做過「h1、h2 及 h3 標籤」排列優化的文章標題,自然在搜尋引擎中會有較前面的排列結果。
所以本篇設置重點則以 Blogger 範本「h1、h2、h3」標籤排列結果 SEO 最佳化為原則,將 Blogger 網誌標題 ( 含文字、圖片 ) 及文章標題的「h1 及 h2」做重新的配置。

這裡規劃設計「首頁、搜尋、標籤 label、網誌存檔」頁面時, HTML 標頭 ( 網誌標題、網誌名稱 ) 顯示「h1」文章標題顯示「h2」。因為在這幾個頁面,文章標題都是處於列表的狀態。
在「item 文章頁面、static_page 靜態網址頁」的情況下標頭顯示「h2」文章標題則顯示「h1」。因為這兩個頁面是「搜尋引擎主要搜尋的目標」。
網誌標題、文章標題除了「h1 及 h2」排列優化外,若你網站的標頭 ( 網誌標題、網誌名稱 ) 是以圖片的呈現方式,經由本篇的設置過後也能夠讓標頭、文章標題的「h1 及 h2」正確顯示。
本文設置後,於 Blogger 中各個頁面的 h1、h2 顯示情形:

上圖大致意思是,搜尋引擎撈取文章頁面與靜態網址頁面的資料時,文章標題為 h1 標籤,網誌標題為 h2 標籤。除了文章頁面與靜態網址頁面之外的「其他頁面」則為,文章標題為 h2 標籤,網誌標題為 h1 標籤。
文章中的範例,僅以下列打勾的官方版型做示例,其他官方版型可如法泡製。如果使用本文做練習,也可應用以下模板試作,出問題的機率會比較低。

相關連結
文字當作網誌名稱,範例網址:「https://demo2.techcoke.com/」( 行動版 DEMO )圖片當作網誌名稱,範例網址:「http://demo3.techcoke.com/」( 行動版 DEMO )
觀察每個頁面的 h1 h2 部署情形,建議使用「Chrome 擴充:Open SEO Stats」。其中的「網頁資訊」功能頁籤,能快速檢測網頁 h1 h2 即時資訊。

設置流程
- 調整小工具、文章日期的 h2 標籤。開啟行動版範本「自訂」功能
- 調整「標頭」區段 HTML 的 h1 h2 標籤
- 調整電腦版行動版「文章標題」區段 HTML 的 h1 h2 標籤
- 調整標頭與文章標題的 CSS 資料
- 非官方版型的簡易 CSS 調整方式
設置前準備
若對編譯 Blogger 的 HTML 模板還不太熟悉,建議先執行『備份 Blogger 模板 (範本)』的動作,以防原始模板資料遺失。開始設置
Step 1 前置作業
調整小工具、文章日期的 h2 標籤。開啟行動版範本「自訂」功能
Step1-1 小工具「標題 h2 標籤」與文章日期「h2 標籤」
本篇在設置前,還需先處理版面配置頁小工具的「標題 h2 標籤」,與文章日期的「h2 標籤」。「小工具」預設在每一次安裝後,Blogger 系統會自動添加「h2 標籤」到小工具的標題中,這需要在每安裝一次小工具時就調整一次。這不利 SEO 部署。比較建議的做法是將「h2 標籤」改為「h3、h4 或 h5」。調整小工具「h2 標籤」為「h3 標籤」請見「Blogger 版面配置小工具標題 HTML 標籤 SEO 優化」。
Blogger 官方預設版型的「文章日期」是配置為「h2 標籤」,這不利 SEO 部署。比較建議的做法是將「h2 標籤」改為「h3、h4 或 h5」。調整文章日期「h2 標籤」為「h4 標籤」請見「Blogger 文章日期 HTML 標籤 SEO 優化」。
Step1-2 開啟 Blogger 行動版範本自訂功能
由於行動版網站的標頭與文章標題也需要正確部署成「h1、h2」的型式,所以必須開啟自訂行動範本的功能。開啟行動範本的自訂功能,可參考「自訂 Blogger 行動版範本與自適應設計原理|STEP 1:使用自訂 Blogger 行動版範本」。Step1-3 公開網誌
為了防止,行動版網頁無法正確對應,請先將網誌設為公開。設置路徑為「設定 〉基本 〉網誌讀者 〉公開」。
Step 2
調整「標頭」區段 HTML 的 h1 h2 標籤
在範本中搜尋「<b:widget id='Header1'」,接著直接使用以下程式碼置換掉原始的標頭範本「<b:widget id='Header1' ~ </b:widget>」之間的資料。代碼中標頭 ( 網誌標題、網誌名稱 ) 區段的詳細說明資料,可參考「Blogger 標頭判斷標記資料整理」。
<b:widget id='Header1' locked='true' title='網誌名稱 (標頭)' type='Header' version='1' visible='true'>
<b:includable id='main'>
<b:if cond='data:blog.pageType == "static_page"'>
<b:if cond='data:useImage'>
<b:if cond='data:imagePlacement == "BEHIND"'>
<!--
Show image as background to text. You can't really calculate the width
reliably in JS because margins are not taken into account by any of
clientWidth, offsetWidth or scrollWidth, so we don't force a minimum
width if the user is using shrink to fit.
This results in a margin-width's worth of pixels being cropped. If the
user is not using shrink to fit then we expand the header.
-->
<b:if cond='data:mobile'>
<div id='header-inner'>
<div class='titlewrapper' style='background: transparent'>
<h2 class='title' style='background: transparent; border-width: 0px'>
<b:include name='title'/>
</h2>
</div>
<b:include name='description'/>
</div>
<b:else/>
<div expr:style='"background-image: url(\"" + data:sourceUrl + "\"); " + "background-position: " + data:backgroundPositionStyleStr + "; " + data:widthStyleStr + "min-height: " + data:height + "_height: " + data:height + "background-repeat: no-repeat; "' id='header-inner'>
<div class='titlewrapper' style='background: transparent'>
<h2 class='title' style='background: transparent; border-width: 0px'>
<b:include name='title'/>
</h2>
</div>
<b:include name='description'/>
</div>
</b:if>
<b:else/>
<!--Show the image only-->
<div id='header-inner'>
<!-- 使用圖片代替網誌名稱 -->
      <div id='headtag'>
           <h2 class='title'>
          <b:include name='title'/>
        </h2>
      </div>
<a expr:title='data:blog.title + "|" + data:description' href='/' style='display: block'>
<img expr:alt='data:title' expr:height='data:height' expr:id='data:widget.instanceId + "_headerimg"' expr:src='data:sourceUrl' expr:width='data:width' style='display: block'/>
</a>
<!--Show the description-->
<b:if cond='data:imagePlacement == "BEFORE_DESCRIPTION"'>
<b:include name='description'/>
</b:if>
</div>
</b:if>
<b:else/>
<!--No header image -->
<div id='header-inner'>
<div class='titlewrapper'>
<h2 class='title'>
<b:include name='title'/>
</h2>
</div>
<b:include name='description'/>
</div>
</b:if>
<b:else/>
<b:if cond='data:blog.pageType != "item"'>
<b:if cond='data:useImage'>
<b:if cond='data:imagePlacement == "BEHIND"'>
<!--
Show image as background to text. You can't really calculate the width
reliably in JS because margins are not taken into account by any of
clientWidth, offsetWidth or scrollWidth, so we don't force a minimum
width if the user is using shrink to fit.
This results in a margin-width's worth of pixels being cropped. If the
user is not using shrink to fit then we expand the header.
-->
<b:if cond='data:mobile'>
<div id='header-inner'>
<div class='titlewrapper' style='background: transparent'>
<h1 class='title' style='background: transparent; border-width: 0px'>
<b:include name='title'/>
</h1>
</div>
<b:include name='description'/>
</div>
<b:else/>
<div expr:style='"background-image: url(\"" + data:sourceUrl + "\"); " + "background-position: " + data:backgroundPositionStyleStr + "; " + data:widthStyleStr + "min-height: " + data:height + "_height: " + data:height + "background-repeat: no-repeat; "' id='header-inner'>
<div class='titlewrapper' style='background: transparent'>
<h1 class='title' style='background: transparent; border-width: 0px'>
<b:include name='title'/>
</h1>
</div>
<b:include name='description'/>
</div>
</b:if>
<b:else/>
<!--Show the image only-->
<div id='header-inner'>
<!-- 使用圖片代替網誌名稱 -->
<div id='headtag'>
<h1 class='title'>
<b:include name='title'/>
</h1>
</div>
<a expr:title='data:blog.title + "|" + data:description' href='/' style='display: block'>
<img expr:alt='data:title' expr:height='data:height' expr:id='data:widget.instanceId + "_headerimg"' expr:src='data:sourceUrl' expr:width='data:width' style='display: block'/>
</a>
<!--Show the description-->
<b:if cond='data:imagePlacement == "BEFORE_DESCRIPTION"'>
<b:include name='description'/>
</b:if>
</div>
</b:if>
<b:else/>
<!--No header image -->
<div id='header-inner'>
<div class='titlewrapper'>
<h1 class='title'>
<b:include name='title'/>
</h1>
</div>
<b:include name='description'/>
</div>
</b:if>
<b:else/>
<b:if cond='data:useImage'>
<b:if cond='data:imagePlacement == "BEHIND"'>
<!--
Show image as background to text. You can't really calculate the width
reliably in JS because margins are not taken into account by any of
clientWidth, offsetWidth or scrollWidth, so we don't force a minimum
width if the user is using shrink to fit.
This results in a margin-width's worth of pixels being cropped. If the
user is not using shrink to fit then we expand the header.
-->
<b:if cond='data:mobile'>
<div id='header-inner'>
<div class='titlewrapper' style='background: transparent'>
<h2 class='title' style='background: transparent; border-width: 0px'>
<b:include name='title'/>
</h2>
</div>
<b:include name='description'/>
</div>
<b:else/>
<div expr:style='"background-image: url(\"" + data:sourceUrl + "\"); " + "background-position: " + data:backgroundPositionStyleStr + "; " + data:widthStyleStr + "min-height: " + data:height + "_height: " + data:height + "background-repeat: no-repeat; "' id='header-inner'>
<div class='titlewrapper' style='background: transparent'>
<h2 class='title' style='background: transparent; border-width: 0px'>
<b:include name='title'/>
</h2>
</div>
<b:include name='description'/>
</div>
</b:if>
<b:else/>
<!--Show the image only-->
<div id='header-inner'>
<!-- 使用圖片代替網誌名稱 -->
<div id='headtag'>
<h2 class='title'>
<b:include name='title'/>
</h2>
</div>
<a expr:title='data:blog.title + "|" + data:description' href='/' style='display: block'>
<img expr:alt='data:title' expr:height='data:height' expr:id='data:widget.instanceId + "_headerimg"' expr:src='data:sourceUrl' expr:width='data:width' style='display: block'/>
</a>
<!--Show the description-->
<b:if cond='data:imagePlacement == "BEFORE_DESCRIPTION"'>
<b:include name='description'/>
</b:if>
</div>
</b:if>
<b:else/>
<!--No header image -->
<div id='header-inner'>
<div class='titlewrapper'>
<h2 class='title'>
<b:include name='title'/>
</h2>
</div>
<b:include name='description'/>
</div>
</b:if>
</b:if>
</b:if>
</b:includable>
<b:includable id='description'>
<div class='descriptionwrapper'>
<p class='description'><span><data:description/></span></p>
</div>
</b:includable>
<b:includable id='title'>
<b:if cond='data:blog.url == data:blog.homepageUrl'>
<data:title/>
<b:else/>
<a expr:href='data:blog.homepageUrl'><data:title/></a>
</b:if>
</b:includable>
</b:widget>
程式代碼說明:
「Step2-1」這裡的程式代碼,使用「item」與「static_page」頁面判斷式,的運作原理如下:
<b:if cond='data:blog.pageType == "static_page"'>
<!-- 當「網誌名稱 (標頭)」在靜態頁面時,「網誌名稱」顯示 h2 -->
<b:else/><!-- 如果不是的話 -->
<b:if cond='data:blog.pageType != "item"'>
<!-- 當「網誌名稱 (標頭)」不在靜態頁面時,又不在文章頁面時,「網誌名稱」顯示 h1 -->
<b:else/><!-- 如果不是的話 --><!-- (* 也就是說,當「網誌名稱 (標頭)」在文章頁面時) -->
<!-- 「網誌名稱」顯示 h2 -->
</b:if>
</b:if>
使用「圖片」代替「網誌名稱 ( 網誌標題 )」
如果你是使用「圖片」代替「網誌名稱」的話,經由上面的設置過後也能夠讓標頭、文章標題的「h1 及 h2」正確顯示。標頭放入圖片後使用以下三種模式,皆可正確使用:

在本文「STEP 2」的代碼中,可以觀察到「
<!-- 使用圖片代替網誌名稱 -->」這段程式碼。「STEP 2」代碼裡面的「<div id='headtag'>」程式代碼,對應「Step4-3」的 CSS。主要目的是不顯示網誌名稱文字。雖然隱藏,但是網誌名稱在各個頁面的 h1、h2 還是能夠正確對應。完整的「
<div id='headtag'>」代碼如下,共有三個: ( 一個 h1、兩個 h2 )
<div id='headtag'>
<h2 class='title'>
<b:include name='title'/>
</h2>
</div>
Step 3
調整電腦版行動版「文章標題」區段 HTML 的 h1 h2 標籤
文章標題的部份,有三個位置需要做更動。各分為行動版「首頁」文章標題、行動版「文章內頁」文章標題、電腦版文章標題。代碼中「文章標題」區段 HTML的詳細說明資料,可參考「Blogger 行動版電腦版文章標題判斷標記資料整理」。Step3-1 調整行動版「首頁」文章標題為 h2
範本中搜尋「<b:includable id='mobile-index-post' var='post'>」接著往下找,可看到以下原始代碼片段:
      <a expr:href='data:post.url'>
        <h3 class='mobile-index-title entry-title' itemprop='name headline'>
          <data:post.title/>
        </h3>
      </a>
將以上原始代碼「h3」的部份變更為「h2」,就完成行動版首頁文章標題「h2」的部署。如下代碼:
      <a expr:href='data:post.url'>
        <h2 class='mobile-index-title entry-title' itemprop='name headline'>
          <data:post.title/>
        </h2>
      </a>
Step3-2 調整行動版「文章內頁」文章標題 h1 h2
範本中搜尋「<b:includable id='mobile-post' var='post'>」接著往下找,可看到以下原始代碼片段:
          <b:if cond='data:post.title'>
            <h3 class='post-title entry-title' itemprop='name'>
              <b:if cond='data:post.link'>
                <a expr:href='data:post.link'><data:post.title/></a>
              <b:elseif cond='data:post.url and data:blog.url != data:post.url'/>
                <a expr:href='data:post.url'><data:post.title/></a>
              <b:else/>
                <data:post.title/>
              </b:if>
            </h3>
          </b:if>
我們將上面「Step3-2」的整體原始程式碼,使用「
item」與「static_page」頁面判斷式部署,即可完成行動版文章內頁「h1、h2」的部署。如下代碼:
<b:if cond='data:post.title'><!-- 行動版範本:文章標題 h1 h2 h3 seo 開始 -->
<b:if cond='data:blog.pageType != "item"'>
<b:if cond='data:blog.pageType == "static_page"'>
<h1 class='post-title entry-title' itemprop='name'>
<b:if cond='data:post.link'>
<a expr:href='data:post.link'><data:post.title/></a>
<b:elseif cond='data:post.url and data:blog.url != data:post.url'/>
<a expr:href='data:post.url'><data:post.title/></a>
<b:else/>
<data:post.title/>
</b:if>
</h1>
<b:else/>
<h2 class='post-title entry-title' itemprop='name'>
<b:if cond='data:post.link'>
<a expr:href='data:post.link'><data:post.title/></a>
<b:elseif cond='data:post.url and data:blog.url != data:post.url'/>
<a expr:href='data:post.url'><data:post.title/></a>
<b:else/>
<data:post.title/>
</b:if>
</h2>
</b:if>
<b:else/>
<h1 class='post-title entry-title' itemprop='name'>
<b:if cond='data:post.link'>
<a expr:href='data:post.link'><data:post.title/></a>
<b:elseif cond='data:post.url and data:blog.url != data:post.url'/>
<a expr:href='data:post.url'><data:post.title/></a>
<b:else/>
<data:post.title/>
</b:if>
</h1>
</b:if>
</b:if><!-- 行動版範本:文章標題 h1 h2 h3 seo 結束 -->
程式代碼說明:
「Step3-2」這裡的程式代碼,使用「item」與「static_page」頁面判斷式運作原理如下:
<b:if cond='data:post.title'><!-- 行動版範本:文章標題 -->
<b:if cond='data:blog.pageType != "item"'><!-- 如果以下內容不在行動版網頁的「文章頁面」時 -->
<b:if cond='data:blog.pageType == "static_page"'>
<!-- 當標題在行動版網頁的「靜態網址頁面」時顯示 h1 -->
<b:else/><!-- 如果不是的話 -->
<!-- 標題顯示 h2 -->
</b:if>
<b:else/><!-- 以下內容在行動版網頁的「文章頁面」時 -->
<!-- 標題顯示 h1 -->
</b:if>
</b:if><!-- 行動版範本:文章標題 -->
「Step3-2」這裡的用法可以觀察到,基本上,就是和標頭段的「
item」與「static_page」,做反向處理即可。Step3-3 調整電腦版文章標題 h1 h2
範本中搜尋「<b:includable id='post' var='post'>」接著往下找,可看到以下原始代碼片段:
    <b:if cond='data:post.title'>
      <h3 class='post-title entry-title' itemprop='name'>
      <b:if cond='data:post.link or (data:post.url and data:blog.url != data:post.url)'>
        <a expr:href='data:post.link ? data:post.link : data:post.url'><data:post.title/></a>
      <b:else/>
        <data:post.title/>
      </b:if>
      </h3>
    </b:if>
接著一樣的,我們將上面「Step3-3」的整體原始程式碼,使用「
item」與「static_page」頁面判斷式部署,即可完成電腦版文章標題「h1、h2」的部署。如下代碼:
<b:if cond='data:post.title'><!-- 電腦版範本:文章標題 h1 h2 h3 seo 開始 -->
<b:if cond='data:blog.pageType != "item"'>
<b:if cond='data:blog.pageType == "static_page"'>
<h1 class='post-title entry-title' itemprop='name'>
<b:if cond='data:post.link or (data:post.url and data:blog.url != data:post.url)'>
<a expr:href='data:post.link ? data:post.link : data:post.url'><data:post.title/></a>
<b:else/>
<data:post.title/>
</b:if>
</h1>
<b:else/>
<h2 class='post-title entry-title' itemprop='name'>
<b:if cond='data:post.link or (data:post.url and data:blog.url != data:post.url)'>
<a expr:href='data:post.link ? data:post.link : data:post.url'><data:post.title/></a>
<b:else/>
<data:post.title/>
</b:if>
</h2>
</b:if>
<b:else/>
<h1 class='post-title entry-title' itemprop='name'>
<b:if cond='data:post.link or (data:post.url and data:blog.url != data:post.url)'>
<a expr:href='data:post.link ? data:post.link : data:post.url'><data:post.title/></a>
<b:else/>
<data:post.title/>
</b:if>
</h1>
</b:if>
</b:if><!-- 電腦版範本:文章標題 h1 h2 h3 seo 結束 -->
程式代碼說明:
「Step3-3」這裡的用法可以觀察到,在用法上與「Step3-2」行動版文章內頁一樣。一樣的將「item」與「static_page」與標頭段的代碼做反向處理即可。
Step 4
調整標頭與文章標題的 CSS 資料
由於我們把原始的標頭 ( 網誌標題、網誌名稱 ) 與文章標題,借用頁面判段式更動了 h1、h2、h3 的範本 HTML 資料。這會導致版面配置頁的「範本設計工具」失效,接下來我們要將他們恢復到正常可用的狀態。如下圖,「範本設計工具」中我們會增添「網誌名稱 h1 (首頁顯示)、網誌名稱 h2 (首頁隱藏)」與「文章標題 h1 (首頁隱藏)、文章標題 h2 (首頁顯示)」的設置選項。

雖然「範本設計工具」中,只能顯示『首頁』的即時預覽「網誌名稱 h1 (首頁顯示)」與「文章標題 h2 (首頁顯示)」的變更。但經由以下 CSS 部署過後,『文章內頁』的「網誌名稱 h2 (首頁隱藏)」與「文章標題 h1 (首頁隱藏)」皆能正常運作。
(* 「範本設計工具」即時預覽看不到,但是直接調整文字粗細、大小、顏色,「網誌名稱 h2 (首頁隱藏)」與「文章標題 h1 (首頁隱藏)」在儲存後,於文章內頁都能正常使用。)
Step4-1 調整標頭的 CSS 資料
範本中搜尋「selector=".header h1"」,可以看到以下標頭的原始 CSS 「範本設計工具」資料。
   <Group description="Blog Title" selector=".header h1">
     <Variable name="header.font" description="Font" type="font"
         default="normal normal 60px Arial, Tahoma, Helvetica, FreeSans, sans-serif" value="normal normal 60px Arial, Tahoma, Helvetica, FreeSans, sans-serif"/>
     <Variable name="header.text.color" description="Title Color" type="color" default="#3399bb"  value="#ffffff"/>
   </Group>
接著直接使用以下代碼,置換上面「Step4-1」標頭的原始 CSS 資料。
   <Group description="網誌名稱 h1 (首頁顯示)" selector=".header h1">
     <Variable name="header.font" description="Font" type="font"
         default="normal normal 60px Arial, Tahoma, Helvetica, FreeSans, sans-serif" value="normal normal 60px Arial, Tahoma, Helvetica, FreeSans, sans-serif"/>
     <Variable name="header.text.color" description="Title Color" type="color" default="#3399bb"  value="#ffffff"/>
   </Group>

   <Group description="網誌名稱 h2 (首頁隱藏)" selector=".header h2">
     <Variable name="header.font2" description="Font" type="font"
         default="normal normal 60px Arial, Tahoma, Helvetica, FreeSans, sans-serif" value="normal normal 60px Arial, Tahoma, Helvetica, FreeSans, sans-serif"/>
     <Variable name="header.text.color2" description="Title Color2" type="color" default="#3399bb"  value="#ffffff"/>
   </Group>
接下來,再到範本中搜尋「
.header h1」,可以找到如下 CSS 資料。
.Header h1 {
  font: $(header.font);
  color: $(header.text.color);
  text-shadow: $(header.shadow.offset.left) $(header.shadow.offset.top) $(header.shadow.spread) rgba(0, 0, 0, .2);
}

.Header h1 a {
  color: $(header.text.color);
}
我們在上段「
.header h1」下面,再增添「.header h2」資料。包含 h1 及 h2 的整體代碼如下:
.Header h1 {
  font: $(header.font);
  color: $(header.text.color);
  text-shadow: $(header.shadow.offset.left) $(header.shadow.offset.top) $(header.shadow.spread) rgba(0, 0, 0, .2);
}

.Header h1 a {
  color: $(header.text.color);
}

.Header h2 {
  font: $(header.font2);
  color: $(header.text.color2);
  text-shadow: $(header.shadow.offset.left) $(header.shadow.offset.top) $(header.shadow.spread) rgba(0, 0, 0, .2);
}

.Header h2 a {
  color: $(header.text.color2);
}

.Header h2 {
    margin-bottom: 10px;
}
到這裡標頭 h1、h2 的「範本設計工具」 CSS 資料就設置完成了,而且開始正常運作。
Step4-2 調整文章標題的 CSS 資料
範本中搜尋「selector="h3.post-title, .comments h4"」,可以看到以下文章標題 h3 的原始 CSS 「範本設計工具」資料。
   <Group description="Post Title" selector="h3.post-title, .comments h4">
     <Variable name="post.title.font" description="Font" type="font"
         default="normal normal 22px Arial, Tahoma, Helvetica, FreeSans, sans-serif" value="normal normal 22px Arial, Tahoma, Helvetica, FreeSans, sans-serif"/>
   </Group>
接著直接使用以下代碼,置換上面「Step4-2」文章標題的原始 CSS 資料。
    <Group description="文章標題 h1 (首頁隱藏)" selector="h1.post-title, .comments h4">
     <Variable name="post.title.font" description="Font" type="font"
         default="normal normal 22px Arial, Tahoma, Helvetica, FreeSans, sans-serif" value="normal normal 22px Arial, Tahoma, Helvetica, FreeSans, sans-serif"/>
   </Group>

   <Group description="文章標題 h2 (首頁顯示)" selector="h2.post-title, .comments h4">
     <Variable name="post.title.font2" description="Font" type="font"
         default="normal normal 22px Arial, Tahoma, Helvetica, FreeSans, sans-serif" value="normal normal 22px Arial, Tahoma, Helvetica, FreeSans, sans-serif"/>
   </Group>
接下來,再到範本中搜尋「
post.title.font」,可以找到如下 h3 的文章標題原始 CSS 資料。
h3.post-title, .comments h4 {
  font: $(post.title.font);
  margin: .75em 0 0;
}
我們使用下面的 h1、h2 文章標題 CSS 代碼,直接置換掉 h3 文章標題的原始 CSS資料。整體代碼如下:
h1.post-title, .comments h4 {
  font: $(post.title.font);
  margin: .75em 0 0;
}

h2.post-title, .comments h4 {
  font: $(post.title.font2);
  margin: .75em 0 0;
}
Step4-3 使用圖片代替網誌名稱,隱藏「網誌名稱文字」
如果在本文「STEP 2」使用圖片代替網誌名稱,還須將網誌名稱做隱藏的動作。搜尋範本中的「]]></b:skin>」在「]]></b:skin>」上面加入以下 CSS 代碼。
#headtag {display: none;}
Step 5
非官方版型的簡易 CSS 調整方式
如果你使用的是非官方的版型,那麼 CSS 部份的調整,應該較為容易。以下使用 Chrome 瀏覽器做為示例。先不要執行本文的 STEP 2 ~ STEP 4。
接著可以在「首頁」與「文章頁面」,對著標頭 ( 網誌名稱 ) 與文章標題按右鍵,選擇檢查。

此時左頁框會顯示 HTML 資料,右頁框會顯示 CSS 資料。將右頁框對應左頁框標頭與文章標題的 h1、h2 中的 CSS 資料,先做複製。

接下來執行本文的 STEP 2 ~ STEP 4 的步驟。
接著找到並註釋掉範本中,原始「標頭 h1」與「文章標題 h1 或 h2 或 h3」中的 CSS 資料。
緊接著於範本中使用以下頁面判段式,慢慢調整 CSS 的部份,即可完成。
<b:if cond='data:blog.pageType == "static_page"'>
<!-- 此段 CSS 只在靜態網址頁面顯示 -->
<style type='text/css'>
/* 放入網誌名稱 h2 的 CSS */
</style>
<style type='text/css'>
/* 放入文章標題 h1 的 CSS */
</style>
<!-- 此段 CSS 只在靜態網址頁面顯示 -->
<b:else/>
<b:if cond='data:blog.pageType != "item"'>
<!-- 此段 CSS 只要不是在「靜態網址頁面」與「文章頁面」皆顯示 -->
<style type='text/css'>
/* 放入網誌名稱 h1 的 CSS */
</style>
<style type='text/css'>
/* 放入文章標題 h2 的 CSS */
</style>
<!-- 此段 CSS 只要不是在「靜態網址頁面」與「文章頁面」皆顯示 -->
<b:else/>
<!-- 此段 CSS 只在文章頁面顯示 -->
<style type='text/css'>
/* 放入網誌名稱 h2 的 CSS */
</style>
<style type='text/css'>
/* 放入文章標題 h1 的 CSS */
</style>
<!-- 此段 CSS 只在文章頁面顯示 -->
</b:if>
</b:if>
小結
文章中「STEP 1 前置作業」的部份一定得先完成,才能開始「STEP 2」,否則會有一些怪現象。「Step1-1 小工具標題 h2 標籤與文章日期 h2 標籤」與本文交雜了一些 CSS 的部份代碼,所以得先解決。額外的,使用文章中的方式部署「標頭、文章標題的 h1、h2」SEO,建議搭配「Blogger 範本:文章標題及網誌名稱 SEO 優化」一起使用。
「STEP 5 非官方版型的簡易 CSS 調整方式」這部份,版型實在太多,基本調整方式,就如「STEP 5」所述。由於瀏覽器是從上往下撈網站資料,所以,不註釋掉範本中,原始「標頭 h1」與「文章標題 h1 或 h2 或 h3」中的 CSS 資料,也無妨。
相關文章
Blogger 範本:文章日期 HTML 標籤 SEO 優化Blogger 範本:版面配置「小工具標題」HTML 標籤 SEO 優化
[教學] Blogger 範本:文章標題及網誌名稱 SEO 優化教學







HI COKE~這篇文章我有在全新範本中成功,全新範本是用基本款的範本。
回覆刪除不過在主要網站中,執行到4-1開始之後,在存檔時系統就會跳出錯誤警示,警示的英文大概就是說不允許第二個HEADER之類的。
原本想說既然他不允許第二個,我就把抵二個GROUP段落給刪除,沒想到就可以存檔。
但,接下來到4-2的步驟又會出現了警語,這次就想說來問問看你的看法了。
(目前已經恢復成原始狀態了,等待COKE的回覆)
不知道是不是因為版型選擇企業版,所以不給執行4-1之後的變更呢? 謝謝
我沒試過「企業版」,你可以靈活運用調試看看。交叉比對「簡單版」與「企業版」兩者範本中 CSS 與 HTML 整體代碼之間的差異。另外要留意一下,是否自己在「版面配置」頁面加入了兩個『標頭』。
刪除有加了兩個標頭!
刪除兩個標頭會造成上面說的異常狀況嗎?
PS:上次有嘗試調整CSS HTML ,不過功力尚未足夠!哈
這部份 Henry 得自行測試,Blogger 在儲存時出現的錯誤,可能就是這個原因。一樣的,有辦法自行安裝兩個『標頭』,就應該要有辦法將問題處理掉,再試試吧,當作自學範本調校,自行將問題解決也較有成就感。
刪除其實本文 STEP 4-1 的部份,不做處理也無坊。讓「文章標題」與「網誌名稱」在文章頁面時,皆顯示為 h1,在首頁時「網誌名稱」則為 h1 「文章標題」則為 h2,這樣佈置也沒有關係。WordPress 版型大都是以此為 HTML 的標準 SEO 設定。(*A)
刪除另一種選擇就是,在文章頁面時僅顯示「文章標題」的 h1,「網誌名稱」則不顯示 HTML 標記 tag。在首頁時則維持「網誌名稱 h1、文章標題 h2」。(*B)
本文在撰寫時的 SEO 部署情境,是以網頁在每個頁面都只保留一個 h1 的方式下去調整的,所以將「文章標題、網誌名稱」兩者,在文章頁面部署為「文章標題 h1、網誌名稱 h2」。比較像是上段留言(*B)的改良版。
一樣的,知道如何修改原始範本中的「文章標題」與「網誌名稱」的 HTML tag 標記與 CSS 資料,這比較重要,本文則提供了另外一種可能的調整方式。不知道有沒有人這樣改過官方範本,這是在寫這篇文章時,玩出的「主題設計工具」創意改法。
謝謝COKE熱心回復!
刪除主要網站的部分個人覺得應該是打掉重做會比較快,哈! 既有網站有些功能想改變,也有計畫想在變更的時候做些註記以方便後續新增/移除語法時候的參考。
像我有看到蠻多人在語法內做這樣的註記,雖然聽說語法越多網頁開啟的速度會越慢,但上面那種註記應該不太有影響才是。
目前這篇文章的教學在乾淨的基本款範本中是完全沒有問題的^^
而且熟悉了要替換的語法位置後,一個範本改完這篇文章的教學大概10分鐘內就搞定了!COKE的教學很清楚^^
對了,在步驟2-1的內容描述中,我在套用時的是直接選「跳至小工具」選擇HEADER1,然後因為原本HEADER那邊是展開的一大塊,就在第一行左邊數字點一下將整段WIDGET縮小後將COKE的新CODE貼上,這樣快好多XD 哈
主要網站的部分個人覺得應該是打掉重做會比較快,哈! 既有網站有些功能想改變,也有計畫想在變更的時候做些註記以方便後續新增/移除語法時候的參考。
刪除像我有看到蠻多人在語法內做這樣的註記,雖然聽說語法越多網頁開啟的速度會越慢,但上面那種註記應該不太有影響才是。
---
『<!-- 註釋符號 -->』影響不大。範本主題中的 CSS 資料量過大,較會造成搜尋機器人不易抓取文章的整體內容。
==================
對了,在步驟2-1的內容描述中,我在套用時的是直接選「跳至小工具」選擇HEADER1,然後因為原本HEADER那邊是展開的一大塊,就在第一行左邊數字點一下將整段WIDGET縮小後將COKE的新CODE貼上,這樣快好多XD
---
沒錯!有些時候直接使用 Blogger 範本主題編輯器修改會更為方便,不一定要用 Notepad++ 。
對了,Blogger 這次改版,也連同將「版面配置」裡的小工具,一同注入到「範本主題」裡了。
「範本主題」中的小工具代碼,有了些變化,「範本主題」中可以直接修改「版面配置」裡的小工具內容物了。
另外,補充一下我對文章內有一段敘述的小小看法(有關文字敘述方面),這是我在看教學時有點猶豫的點,所以特此回復告知COKE參考一下。
回覆刪除===
4-1的步驟中,下面這段:
【我們在上段「.header h1」下面,再增添「.header h2」資料。整體代碼如下:】
文內是敘述在h1下面來『增添』代碼,不過因為銜接上一段的"正常代碼",曾經一度讓我猶豫是不是要接在H1下面放新的CODE。(因為H1下方還有H1a,所以插下去新代碼應該會變成重複了H1跟H1a的語法)
但這樣看起來怪怪的,文章內的意思應該是【替換】下方新代碼,對嗎?
如果是我理解的狀況,那看看COKE是不是也覺得可以修改一下描述會比較好?(因為之前COKE所有的教學中,都是用整個新舊替換的敘述,而這次4-1的步驟是描述【在下方插入】,但實際上看起來應該是整段替換才是?,所以留言告知順便訊問看看)
謝謝:)
4-1 的部份,沒有問題,就是怕大家找不到位置,或是放錯位置,才會寫說『我們在上段「.header h1」下面,再增添「.header h2」資料。整體代碼如下:』。敘述是說,是包含 h1 及 h2 的 (*整體代碼)。
刪除呀!改成這樣好了。『我們在上段「.header h1」下面,再增添「.header h2」資料。包含 h1 及 h2 的整體代碼如下:』。
好唷~~這樣也很棒^^
刪除Hello COKE,先謝謝你不斷地給我幫助:)
回覆刪除我的一些測試網站有先用了基本版型後調教了一下H1 H2(本篇教學),而原本以為調教到跟你的設定相同,沒想到看了一下還是有一點點差異,不知道是不是哪裡有設定錯誤?
測試網站
https://korea3c.wanghenry.com/
跟你網站差異的地方有:
斜體、ALT本文、正文、META關鍵字等等~
不知道這些差異有無很大的影響或是差異呢? 謝謝!
我的一些測試網站有先用了基本版型後調教了一下H1 H2(本篇教學),而原本以為調教到跟你的設定相同,沒想到看了一下還是有一點點差異,不知道是不是哪裡有設定錯誤?
刪除---
我不是 SEO 專家,僅在喜歡研究。不過測試網站『https://korea3c.wanghenry.com/』的網誌標題「WangHenry韓國3C團購」,蠻符合本文的應用情境。當「WangHenry韓國3C團購」在文章頁面設置為 H2 時,『韓國3C團購』與測試網站「文章頁面」的 H1 文章標題會互相呼應,文章內容也與『韓國3C團購』有關聯。
===============================
META 關鍵字:keywords 可以不用設置,目前已不被列入 Google。
斜體:文章中有寫到斜體的部份,就會出現斜體,這點不用在意。
粗體:一樣的,是劃重點的意思。建議「粗體」可以內含標題和描述的相關文字。(*讓「粗體」與文章標題、描述內容相符。) 粗體,可以加強搜尋機器人,撈取文章的深度。建議,多搜尋相關文章學習。
ALT 本文:寫文章時,「圖片屬性」加入標題文字及說明文字即可。標題文字為 title,說明文字為 alt。當有人在做 Google 圖片搜尋時,設置 ALT,能讓文章圖片在「圖片搜尋結果」中顯示。
https://4.bp.blogspot.com/-g1_G_FinroQ/WPRDKM2K6BI/AAAAAAAAJN0/XHfUvzLVf50G1TABMYU85PH8Zxdk1WycQCLcB/s1600/blogger-h1-h2-h3-tag-seo-comments-001.jpg
正文:這點目前還在研究,如何在 Blogger 裡做修改。
建議 Chrome 再安裝「[外掛] Chrome 擴充:META SEO inspector 網站 META SEO 分析工具」。META SEO inspector 能在寫完文章後,幫忙觀察文章標題、描述搜尋字數,及網站整體 ALT 部屬情形。
原來這些差異的來源是這些! 很抱歉我沒有注意到"顧名思義"的關聯!哈~
刪除平時就習慣部分重點使用粗體[B],偶爾斜體[I]!!
經過COKE解釋,也了解了照片的名詞用意在哪裡了,我一直以為在圖片的原始檔案命名時就好了~哈哈。
謝謝~